Sensor Observation Service (SOS)
Introduction
Sensor Observation Service (SOS) enables data ingestion from sensors, devices and IoT gateways to backend IoT data sensor observation stores. It provides a rich set of queries to discover and use those data, facilitates the registering of new sensors and “things” to the platform and inserts observations and measurements from various types of sensors into the data store. This service virtually allows any type of sensors and observations to be supported. SOS can be used for both streaming data as well as batch data.
Purpose of the Document
The following document describes the basic steps to work with Sensor Observation Service. After going through this, the users will able to create feature, sensor, retrieve the created sensors, post sensor observation data in SOS and see the data posted by a sensor.
Reference Document
Please refer to the following documents to get more details on SOS:
To understand the basic concepts of SOS please refer to the Concept guide.
For API details of SOS please refer to the API guide.
Working with SOS
Feature Creation
Any real world entity, ‘asset’ or ‘thing’ is referred to as a ‘Feature of Interest’ or Feature in the SOS. While using Sensor Observation Service first step is to create feature which is the real world entity. The objective is to measure some properties of the feature using sensors. In the following example patient is the feature and we are measuring the blood pressure of the patient using a sensor.
Feature can be created using SOS API from the swagger API sandbox.
To open the SOS swagger click on API Sandbox from the left side of the menu and then select ‘Sensor Observation Service’. You will find the option to create the feature as shown in the image below.
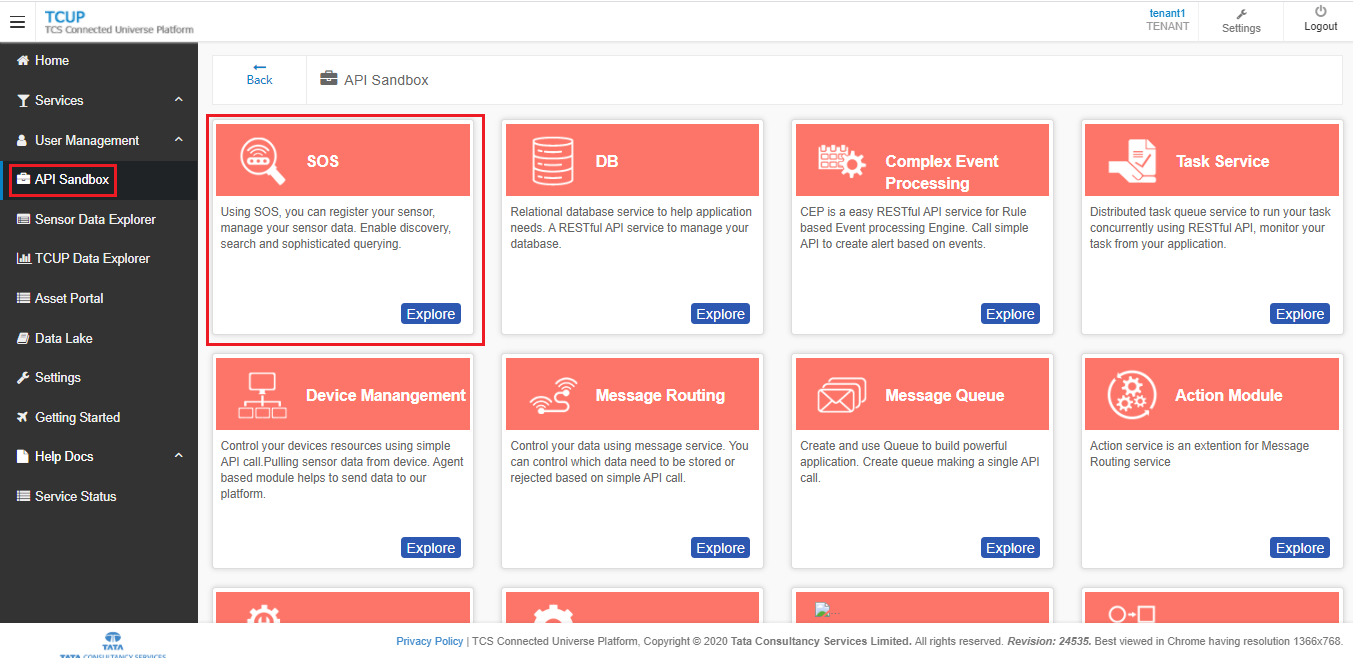
In the swagger page select
POST /featuresoption underfeature controllerEnter the feature creation JSON and click on
Try it Out. On successful creation of feature you will get the status as CREATED.
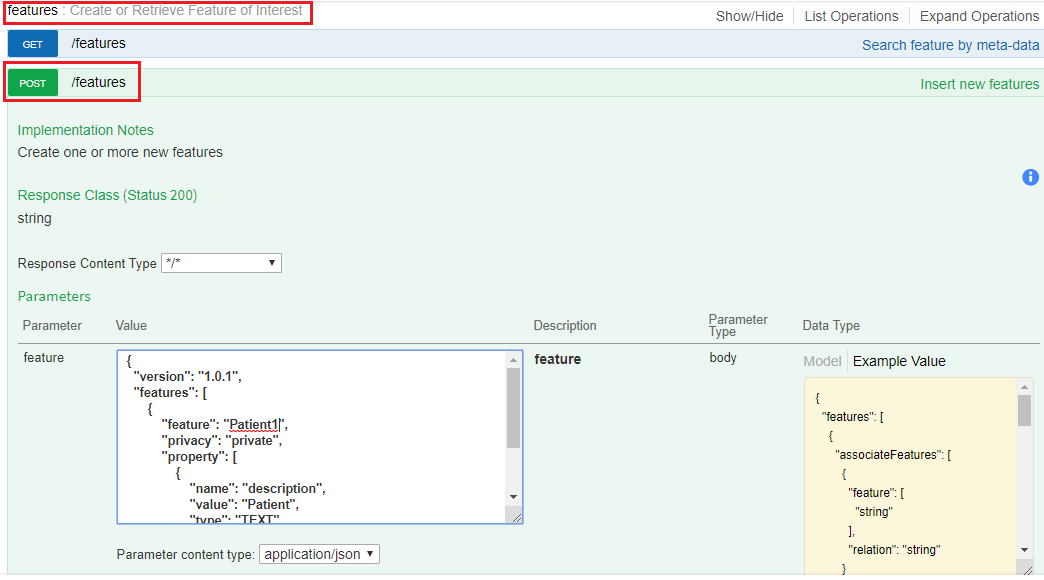
Sample JSON for creating a feature called “Patient1” is given below:
{
  "version": "1.0.1",
  "features": [
      {
          "feature": "Patient1",
          "privacy": "private",
          "property": [
              {
                  "name": "description",
                  "value": "Patient",
                  "type": "TEXT"
              }
          ]
      }
  ]
}
Note
JSON is an open standard information interchange format which has been widely adopted by many APIs.
Sensor Creation
A sensor is anything that can observe a real-world entity and can generate observations or measurements related to one or more properties of the feature as an output. A blood pressure monitor can be modelled as a sensor. Output from the sensor are referred to as observed property. Here the observed properties from the sensor are systolic pressure and diastolic pressure.
Once feature is created it is required to create sensor to observe one or more properties of the feature. So a sensor should be attached to a feature.
Sensor has to be created using the swagger API of SOS.
In the swagger page select the
POST /sensorsoption undersensor controllerEnter the sensor creation JSON and click on
Try it Out. On successful creation of sensor you will get the status as CREATED.
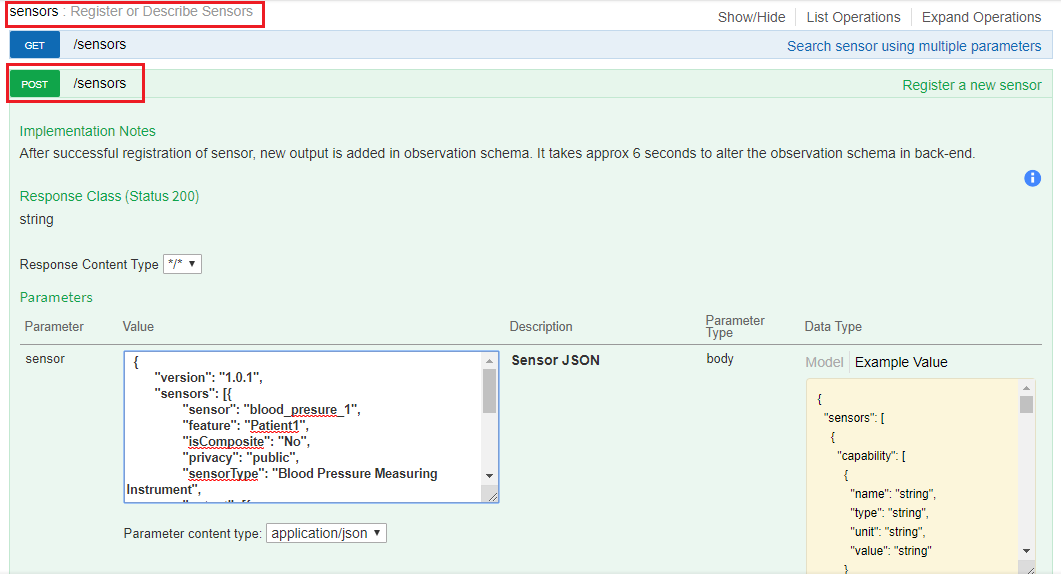
Sample JSON for creating a sensor called “blood_presure_1” is given below:
{
      "version": "1.0.1",
      "sensors": [{
              "sensor": "blood_presure_1",
              "feature": "Patient1",
              "isComposite": "No",
              "privacy": "public",
              "sensorType": "Blood Pressure Measuring Instrument",
              "output": [{
                              "name": "systolic",
                              "type": "integer"
                      },
                      {
                              "name": "diastolic",
                              "type": "integer"
                      }
              ]

      }]
}
Note
We can always create a sensor without a feature attached to it and attach the feature at a later time.
Multiple sensors can be attached with a feature.
Posting Sensor Observation
Sensor observation data is the value of the observations captured by the sensor. These are the data posted by sensor.
Swagger is available to post sensor observation data for a particular sensor to SOS as shown below.
Click on post observations under observation-controller.
Write the observation JSON there and click on
Try It Out. If the observation is posted successfully, a success message as ‘Created’ can be seen along with the observation ID.
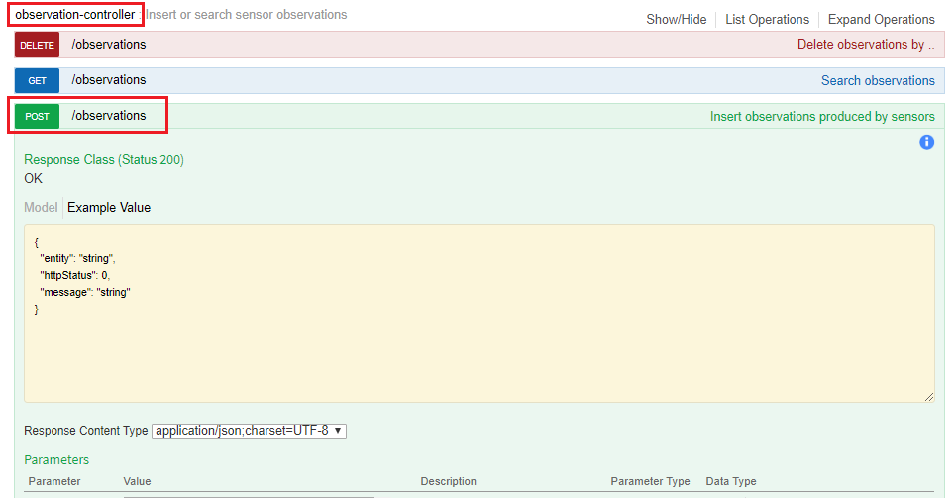
Sample observation JSON is given below:
{
 "version": "1.0.1",
 "observations": [{
  "sensor": "blood_presure_1",
  "feature": "Patient1",
  "record": [{
   "starttime": "11-Dec-2019 14:00:00 IST",
   "output": [{
    "name": "systolic",
    "value": "140"
   },
   {
    "name": "diastolic",
    "value": "90"
   }]
  }]
 }]
}