Bootstrap and Over the Air Service
Introduction
Bootstrap Service enables remote devices to get TCUP URLs endpoints and credentials over a secured channel. It enables and automates the device registration and connectivity process eliminating the need for human intervention or manual inputs at the remote sites. This service addresses the key distribution challenge across multiple devices in multitenant systems.
Over The Air (OTA) Update Service provides the ability to securely install and update applications and configurations in remote devices connected to TCUP (TCS Connected Universe Platform). It provides the facility to remotely upload patches to a device and upgrade application software or configuration files on the device. OTA service can also be used for execution of commands/scripts on the target device (for example reboot/restart of device) and execute read or write operations on the device.
Purpose of the Document
After going through the following document, a user will able to use OTA service and run a remote package on the connected device. It also describes how to install bootstrap agent in the device.
In the use case here we are considering ‘UBUNTU16’ machine as a device.
The following are the steps to work with OTA agent:
Install appropriate bootstrap agent in the target device.
Install appropriate OTA agent in the target device.
Start OTA agent on the target device from a terminal or as a service to connect the device with TCUP OTA.
Pre-register the target device.
Create and upload the required package to staging area.
Copy the package from staging to the repository.
Run the file.
Check the status
All the steps are described in the document below.
Reference Document
Please refer to the following documents to get more details on Bootstrap service
To understand the basic concepts of Bootstrap please refer the Bootstrap Concept guide.
For API details of Bootstrap please refer to the Bootstrap API guide.
Please refer to the following document to get more details on OTA service
To understand the basic concepts of OTA please refer to the OTA Concept guide.
For API details of OTA please refer to the OTA API guide.
OTA Service Using Portal
Accessing Portal
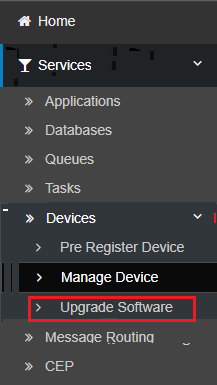
To navigate to the portal of OTA service, after signing in to TCUP click on the link Services on the left hand side menu and then click on Devices. After clicking on Devices, there would be three sub headings as shown in the image below:
PreRegister Device
Manage Device
Upgrade Software
The update software submenu in the portal page for OTA service.
Install Bootstrap Agent in Device
Copy the bootstrap agent binary in the device along with the client certificate and client key files.
Run the bootstrap agent installer. This is a CLI based Q&A which the user needs to answer during the setup. The following is a sample for bootstrap installation.
sudo ./install.sh
You are installing Bootstrap Agent ....
Ensure that bsagent executable & necessary certificate files are present in current directory
Do you want to proceed (y/n)? : y
bsagent binary found
Do you want to enable HTTP(S) (y/n)? : y
Yes
Do you want to use self-signed certificate (y/n)? : n
No
Do you want to install client certificate for mutual authentication (y/n)? : y
Yes
Type client certificate filename : client.pem
client.pem file found
Type client key filename : client.key
client.key file found
Enter poll interval 10 ~ 14400 (secs): 10
Generating Configuration file
Copying client.pem file to /*/.bootstrap/certs path
Copying client.key file to /*/.bootstrap/certs path
Type TCUP server host URL followed by [ENTER] :
<host URL>
OK
Type TCUP server host HTTP/HTTP(S) port (443 for HTTPS), followed by [ENTER] :
443
OK
Creating settings file
Agent copied to /opt/bsagent
Do you want to install as systemd service(y), run manually from command line(n) (y/n)? : y
Agent will be installed as systemd service
Failed to stop bsagent.service: Unit bsagent.service not loaded.
Adding bsagent.service service file
Created symlink /*/*/system/multi-user.target.wants/bsagent.service → /lib/systemd/system/bsagent.service.
Agent successfully installed as service
Bootstarp Agent started...
Use command service bsagent start/stop/restart to start/stop/restart agent manually if you select the agent to run manually.
Install and Start OTA Agent in Device
Perform the following steps to install and start OTA agent in device
Copy the OTA agent binary in the device along with client certificate.
Go to the OTA folder and run the install.sh file.
This is Q&A based which the user needs to answer during the setup as shown in the sample below:
sudo ./install.sh
You are installing OTA Agent ....
Ensure that otaagent executable & necessary certificate files are present in current directory
Do you want to proceed (y/n)? : y
otaagent binary found
Do you want to enable Bootstrap feature (y/n)? : y
Yes
Do you want to enable HTTP(S) & MQTT(S) SSL (y/n)? : y
Yes
Do you want to use self-signed certificate (y/n)? : n
No
Generating Configuration file
Make sure that you also install BS Agent
Type your device name, followed by [ENTER] :
XXXXXXXXXXXX
OK
Type your device model name (space not allowed), followed by [ENTER] :
UBUNTU16
OK
Type your device location, followed by [ENTER] :
XXXXXXXXXXX
OK
Creating lsettings file
Agent copied to /opt/otaagent
Do you want to install as systemd service(y), run manually from command line(n) (y/n)? : y
Agent will be installed as systemd service
Adding otaagent.service service file
Agent successfully instaled as service
OTA Agent started...
You can check agent log message with <tail -f <path>/syslog |grep otaagentd > command
Use command <service otaagent start/stop/restart> to start/stop/restart agent
Note
Users have to select the self signed certificate option as ‘No’ for LETSENCRYPT certificate and the device need to have the CA certificates shared with the agent.
When self signed certificate is selected as ‘Yes’, the users have to provide their own certificate.
Users can either start the service as system service or can run manually after the installation. Once the agent is started the device is connected to TCUP OTA service.
Checking Device Status from Portal
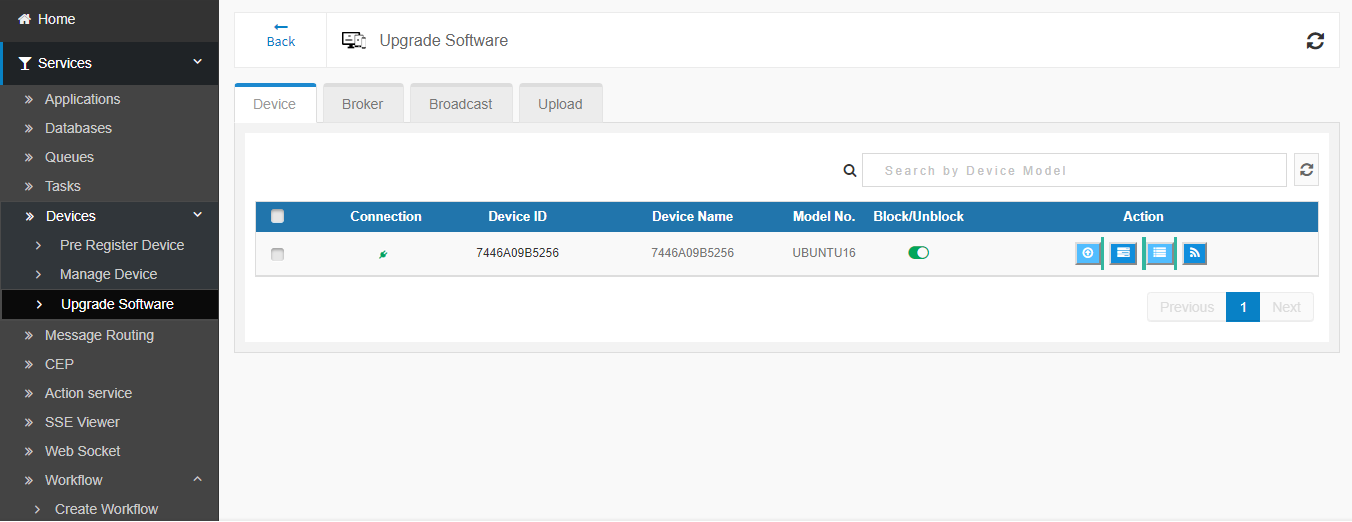
Go to OTA portal page.
The registered device can be found under the device tab.
Once the device is connected the connection status becomes green
Pre-register Device in TCUP
The device has to be pre-registered to work with OTA service. While registering the device the device ID/ EPN ID should be the same as the device ID identified by the OTA agent. Please refer to Pre Register Device for details.
Create OTA Package
OTA update files are actual target files & installer scripts. The users should have the package in hand which they can upload and execute. Installer scripts are ordered as 1.sh, 2.sh ….n.sh scripts.
Users should have the CreateUpdatePackage utility
Get pre-built jar from TCUP team to run it.
Download json-simple-1.1.1.jar, jtar-1.1.jar from the internet and add them as third party jar to build.
Now run the jar file
\OTA Packages$ java -jar CreateUpdatePackage.jar
This will open the TCUP OTA package creator utility tool.
Upload the required file and click on
Create.
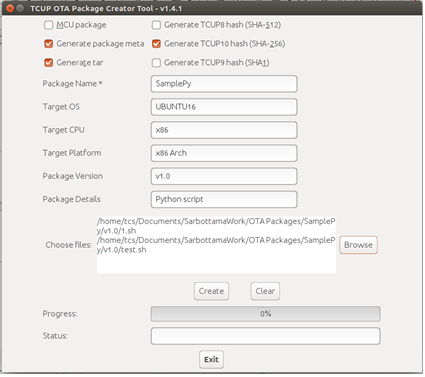
Verify that JSON, tar and sha files are created as shown below:

Upload OTA Package and Run
To upload the OTA package at staging area:
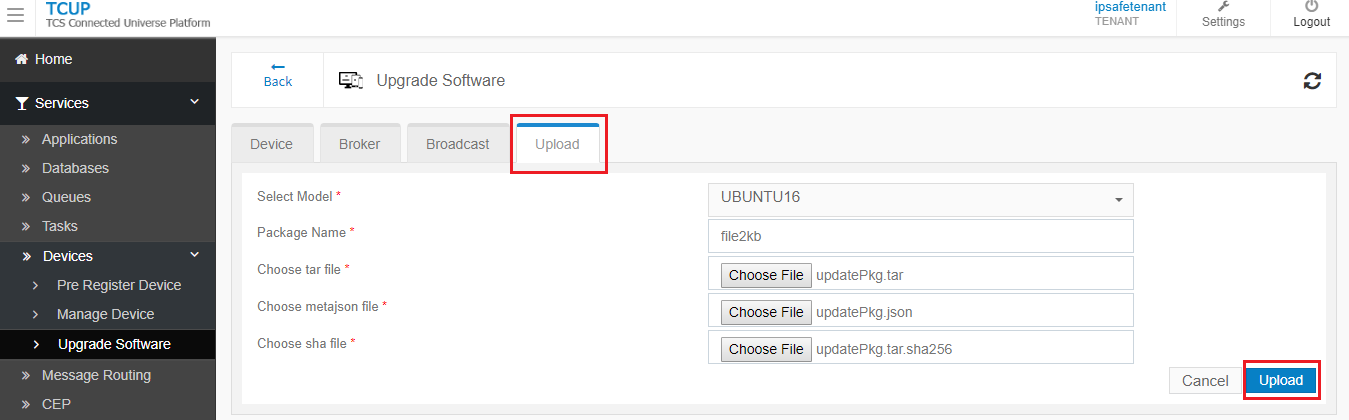
Open the OTA portal and click the upload tab.
Select the model name from drop down for which you want to run the update, mention the package name and upload the 3 files created in the previous step.
Click upload to upload the package.
The package will be uploaded at staging area.
To check the staging area click on the device tab in the portal and then under the action of the connected device check
Browse Staging Area. You will able to find the uploaded package and version.
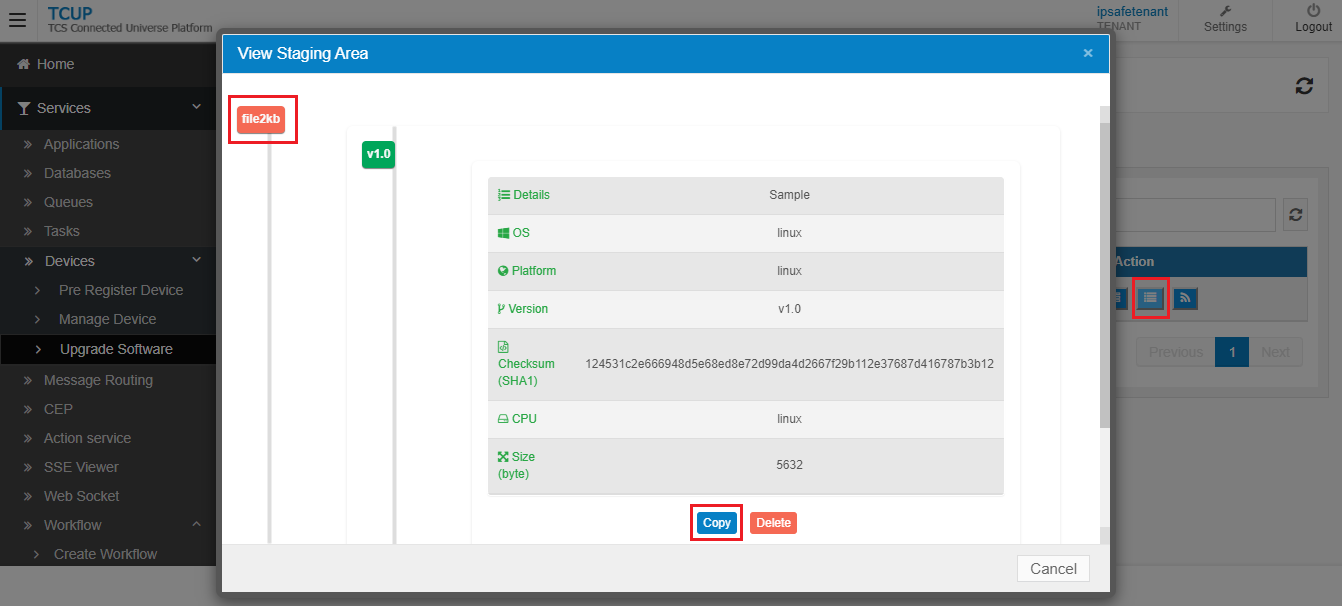
On clicking the
Copybutton the file will be copied from staging to repository area.Check the repository by clicking
Browse Repository Area.
Now we have two options to run the package. You can either run it for a single device or for all the devices having the same model.
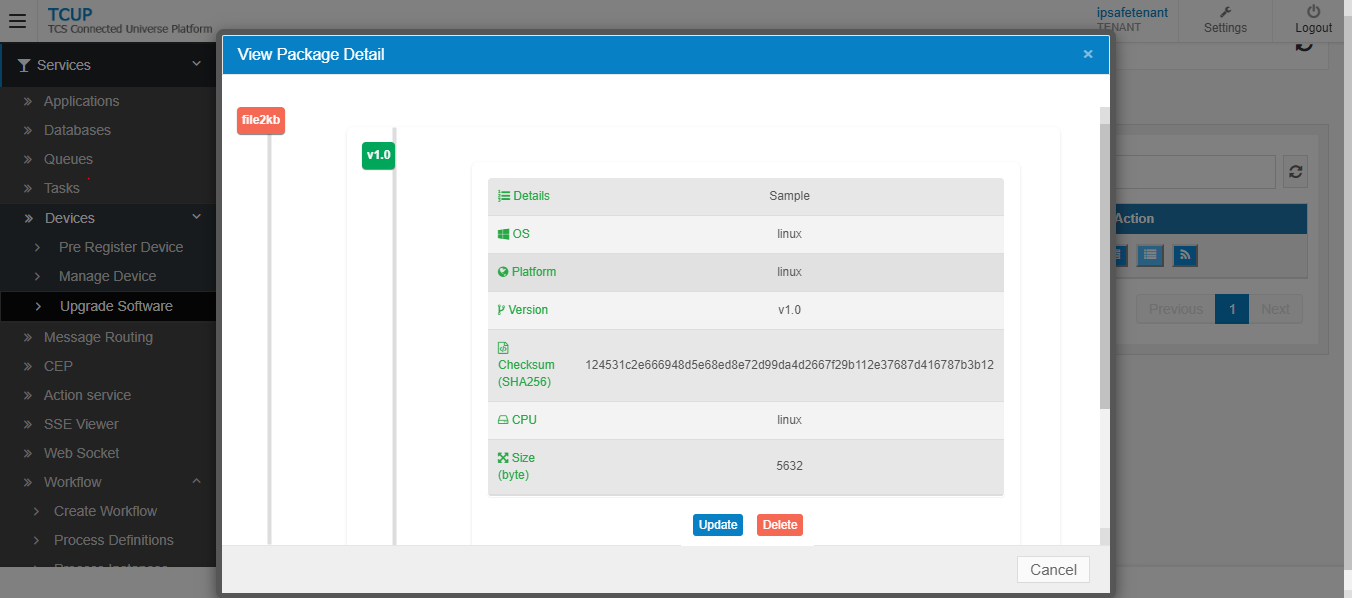
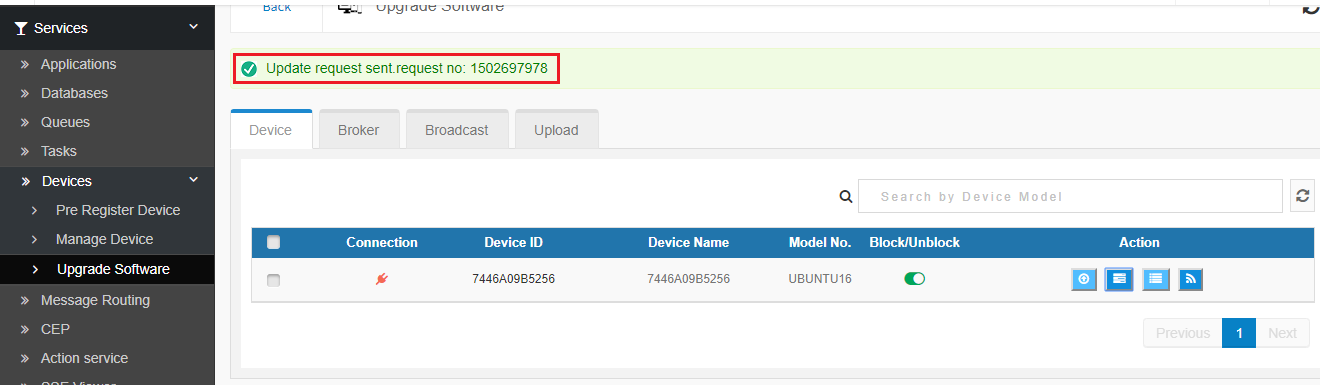
Run Package for Single Device
From view Package details screen click on
Updateto run the package.It will ask you for the option if you want to transfer file in block mode or not.
Select the appropriate option and click on
Proceed, you will get a confirmation on the screen that the request has been sent successfully.
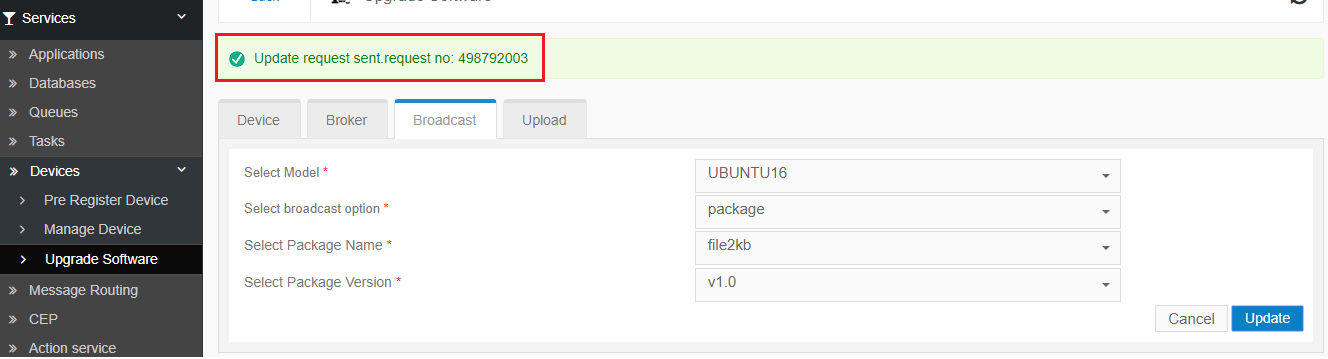
Run Package for Model
Go to the broadcast tab in OTA portal page.
Select model, broadcast option, package name and package version from the drop down.
Click on
Updatebutton.

You will get a confirmation message on the screen with the request number.
Check Status of Request
Open the get status/reqid API under Status Controller in API swagger page.
Enter the EPN ID and request ID. This will return you the status of the request in JSON as follows:
{
  "status": "success",
  "code": 200,
  "data": [
    {
      "logid": 29,
      "epnid": "7446A09B5256",
      "userid": "ipsafetenant",
      "reqid": 1502697978,
      "scode": 301,
      "pkgname": "file2kb",
      "pkgver": "v1.0",
      "timestamp": "2019-12-04T11:35:05.791237Z[UTC]"
    },
    {
      "logid": 30,
      "epnid": "7446A09B5256",
      "userid": "ipsafetenant",
      "reqid": 1502697978,
      "scode": 204,
      "pkgname": "file2kb",
      "pkgver": "v1.0",
      "timestamp": "2019-12-04T11:35:06.926699Z[UTC]"
    },
    {
      "logid": 31,
      "epnid": "7446A09B5256",
      "userid": "ipsafetenant",
      "reqid": 1502697978,
      "scode": 60,
      "pkgname": "file2kb",
      "pkgver": "v1.0",
      "timestamp": "2019-12-04T11:35:06.939188Z[UTC]"
    },
    {
      "logid": 32,
      "epnid": "7446A09B5256",
      "userid": "ipsafetenant",
      "reqid": 1502697978,
      "scode": 200,
      "pkgname": "file2kb",
      "pkgver": "v1.0",
      "timestamp": "2019-12-04T11:35:07.887247Z[UTC]"
    }
  ],
  "message": "Update status log"
}