Websocket
Introduction
Websocket data viewer service is a two way communication protocol between the servers and the clients which is used to inject (publish) and consume (subscribe) high volume data or events/ messages to TCUP.
Client can inject high volume data to TCUP using websocket protocol. Directly using websocket publisher, users can send data either to direct exchange, topic exchange by specifying corresponding exchange names, routing key and topic or to message queue. This publisher can be used instead of MR SendRequest() for better performance.
Server can also push events/messages to the client like server sent event. Similar to SSE, Websocket also allows to view the events/messages which are posted either on any topic of topic exchange or on any message queue.
A publisher and a subscriber java client application is also provided to send and receive data.
Purpose of the Document
After going through this document users will be able to publish data to kafka Topic of Topic using websocket.
Users will also be able to subscribe to any Topic Exchange and view data posted to the Topic Exchange from websocket.
Reference Document
Please refer to the following documents to get more details on Websocket
To understand the basic concepts of Websocket please refer the Concept guide.
For API details please refer the API guide.
Publishing Data using Websocket
Publish Data from Portal
The websocket viewer portal page is embedded under services tab on the left hand side of the portal home page as shown in the image below.
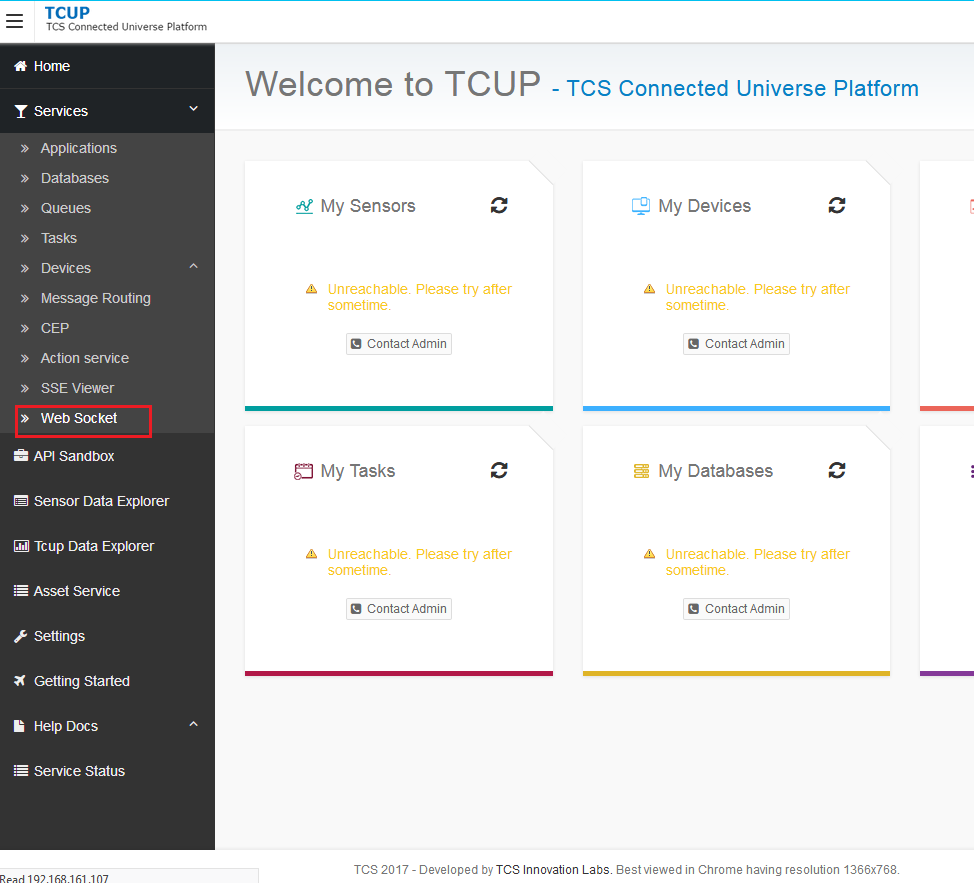
On clicking on ‘Websocket’, the websocket page is launched .
Here the
Topic Exchange Nameneeds to be provided as given in the MR rule.
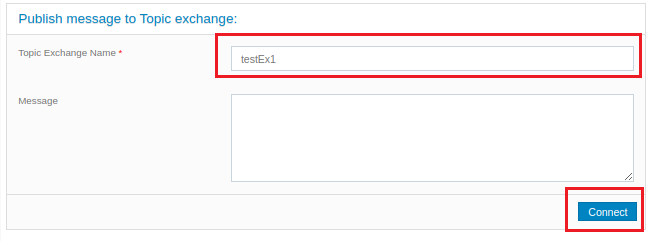
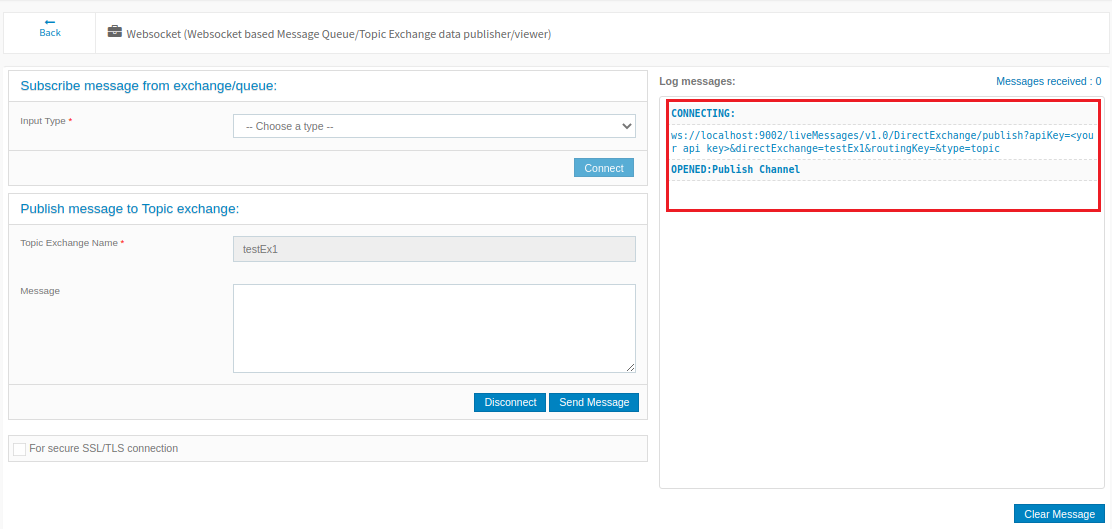
Once the user clicks the Connect button the websocket connection gets established. Users can then observe the status of the connection from the log messages in the right panel.
Note
For secure connection, the SSL/TLS check box has to be checked.
Refer to the Sample Input JSON section to find sample data to post.
Websocket Publisher URL
Websocket Publisher URL for apiKey User
Websocket URL to publish to Topic Exchange:
ws://<BaseURL>/liveMessages/v1.0/DirectExchange/publish?apiKey=<your apikey>&directExchange=<Direct Exchange>&routingKey=<routing key>&type=topic&ContentType=<content type>
Websocket Publisher URL for JWT user
Websocket URL to publish to Topic Exchange:
ws://<BaseURL>/liveMessages/v1.0/DirectExchange/publish?apiKey=<your apikey>&directExchange=<Direct Exchange>&routingKey=<routing key>&type=topic&ContentType=<content type>
For SSL/TLS connection the URL will start with wss://
Note
This URL can be used from any outside websocket client to post data to the Topic exchange using this websocket server. ContentType to be provided in case of external connection otherwise text/plain will be taken as default ContentType.
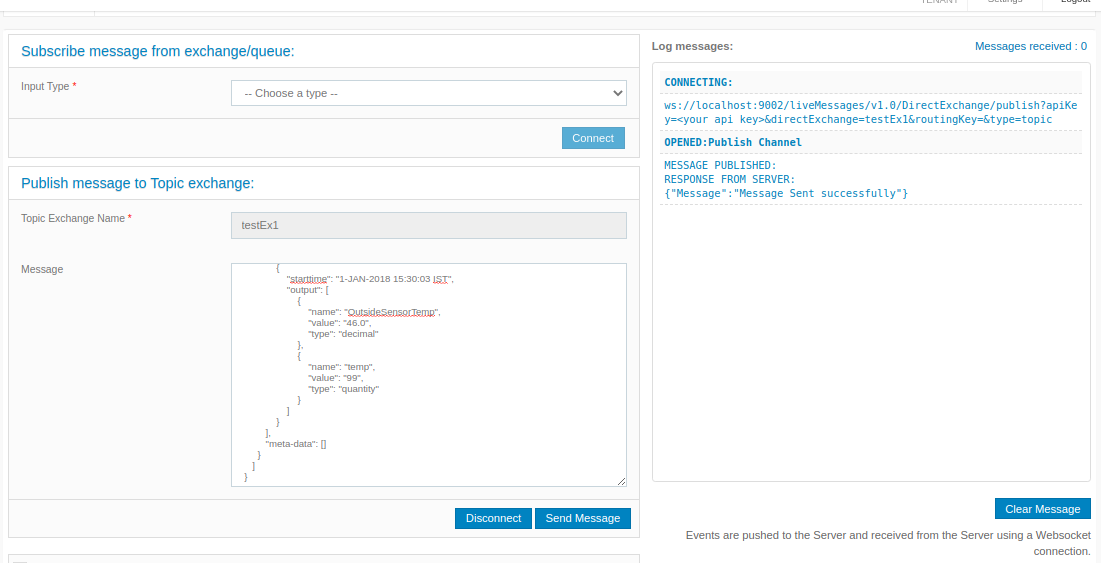
Once the connection is established, the user can send SOS JSON by clicking the Send Message button. A success message is shown as response in the log messages. After this, the user can check the SSE viewer page or Websocket data viewer which subscribes to output.
Publishing Using Java-Client
A java client websocketSSL.jar is provided along with a config.properties file to serve this purpose.
The steps mentioned below are followed in order to use the java publisher:
In the
config.propertiesmodify the propertiesBASEURL,APIKEY,TopicandContentType.Run the .jar file along with the streamFile (JSON to be published) path and repeat count(how many times the JSON has to be repeated).
Note
For secure SSL/TLS connection add the certificate for the websocket server to the key store which we will use for the Trust Manager. In this case the user needs to mention the TRUSTSTORE_FILE and TRUSTSTORE_PASSWORD in the config.properties file.
Subscribe/View Data using Websocket
Subscribe/View Data from Portal
This viewer is also used to view the output of MR/CEP rule by subscribing to the output topic/queue.
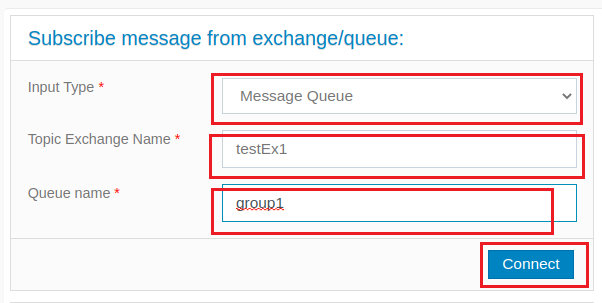
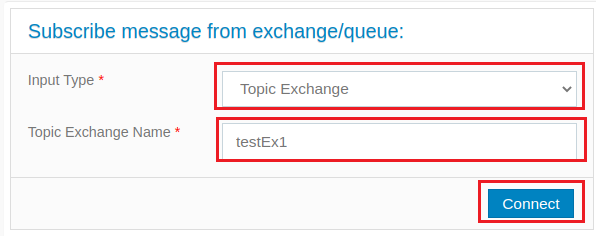
Users have to provide the details like Input Type. if the input type is Topic the Topic Exchange Name to be provided and if the input type is Queue the Topic Exchange Name``along with the ``Message Queue Name which is nothing but the consumer group name has to be provided . After providing these details click on Connect button to subscribe to the channel.
Note
For secure connection check the SSL/TLS check box.
Websocket Subscriber URLs
Websocket Subscriber URLs for apiKey User
Websocket URL to view from broker queue:
ws://<BaseURL>/liveMessages/v1.0/subscribe?apiKey=<your apiKey>&name=<queueName>&type=queue&Accept=<type of payload expected>
Websocket URL to view from broker topic:
ws://<BaseURL>/liveMessages/v1.0/subscribe?apiKey=<your apiKey>&name=<topicExchange>&topic=<topic>&type=topic&Accept=<type of payload expected>
Websocket subscriber URLs for JWT user
Websocket URL to view from broker queue:
ws://<BaseURL>/liveMessages/v1.0/subscribe?token=<your JWT>&name=<queueName>&type=queue&Accept=<type of payload expected>
Websocket URL to view from broker topic:
ws://<BaseURL>/liveMessages/v1.0/subscribe?token=< your JWT>&name=<topicExchange>&topic=<topic>&type=topic&Accept=<type of payload expected>
For SSL/TLS connection the URL will start with wss://
Note
These URLs can be used from any outside websocket client to subscribe data from the mentioned topic/ queue by providing the corresponding user apiKey. When using from outside user need to provide the type of payload client expects as Accept.By default it will accept text/plain
The connection status can be shown from the log messages in the right panel as shown in the image below:

Once data is posted to the specified Input type output can be shown as below.
The total number of messages received by the consumer is shown under Messages Received.
A Clear Message button is also provided to clear all the console logs.
Subscribing Using Java-client
A java client WebSocketSubscriber.jar is provided along with a config.properties file to serve this purpose.
The steps mentioned below are followed in order to use the java subscriber:
In the
config.propertiesmodify the propertiesRECEIVEURL,APIKEYandAccept,dumpToFile,outputPath.run the .jar file along with ‘queue’ or ‘topic’ as arguments and give the required inputs as shown in the image below:
Note
For secure SSL/TLS connection add the certificate for the websocket server to the key store which we will use for the Trust Manager. In this case the user needs to mention the TRUSTSTORE_FILE and TRUSTSTORE_PASSWORD in the config.properties file.
Sample Input JSON
Following is the sample input JSON to post data.
Input SOS JSON
{
  "version": "1.0.1",
  "observations": [
    {
         "sensor": "NEXUS1",
         "feature": "room1",
         "record": [
             {
                 "starttime": "1-JAN-2018 15:30:03 IST",
                 "output": [
                     {
                         "name": "OutsideSensorTemp",
                         "value": "46.0",
                         "type": "decimal"
                     },
                     {
                         "name": "temp",
                         "value": "99",
                         "type": "quantity"
                     }
                 ]
             }
         ],
         "meta-data": []
      }
    ]
 }