Position Based Filtering - Geolocation
The position can be of type rectangle/polygon/circle. Based upon the type and points the parsing will be made. For example if one wants to pass all the observations which occurs within a specified circle/rectangle/polygon then they can always choose to define the proper positions in the rule. The below points can be followed for specifying the position.
Below is the create rule JSON for position based filtering:
{
  "RuleName": "Demo rule position based",
  "RuleDescription": "Demo rule for user guide",
  "input": {
     "DirectExchange": "Direct.Exchange",
     "RoutingKey": "e325f4fe-a0e3-4252-82af-4c24deb8c0cf"
  },
  "params": [
     {
         "name": "feature",
         "value": "room1"
     },
     {
         "name": "sensorID",
         "value": "NEXUS1"
     },
     {
         "name": "time",
         "value": {
             "starttime": "",
             "endtime": ""
         }
     },
     {
         "name": "expression",
         "value": {
             "if": "",
             "then": "",
             "else": ""
         }
     },
     {
         "name": "position",
         "type": "rectangle",
         "geoFencing": "NO",
         "value": {
             "points": [
                 {
                     "x": "22.613",
                     "y": "88.505"
                 },
                 {
                     "x": "22.577",
                     "y": "88.442"
                 }
             ]
         }
     },
     {
         "name": "ObservedProperties",
         "value": [
             {
                 "name": "",
                 "type": "Text/quantity/count",
                 "value": "",
                 "operator": ""
             }
         ]
      }
   ],
   "output": {
     "TopicExchange": "DemoExchange",
     "Topic": "demo9"
  }
 }
As we can see in the above JSON, sensor ID, feature and position as rectangle is provided which acts as filtering condition for input data and routes input data with sensor NEXUS1, feature as room1 and rectangle geo location with the given north east latitude-longitude and south west latitude and longitude coordinates. Here we have an additional parameter as geo fencing as YES or NO, this acts as entry and exit parameter and checks for the first entry or first exit of the input data. In case input data has coordinates value outside the given MR coordinates or the sensor, feature value other than above, it will discard the data. Topic exchange name is the name of exchange DemoExchange which we have already created in the topic exchange section.
In the above create rule JSON combination of position type can be rectangle, circle or polygon. We will explain each position type in the following section.
Note
The “x” and “y” in the above JSON are the latitude and longitude respectively. It should be valid and must exist on earth. One way is to get the location coordinate using the below two URLs.
Geometry should be formed according to the requirement. Then the coordinates of the geometry has to be added in MR rule.
Create Rule - Rectangle Geolocation
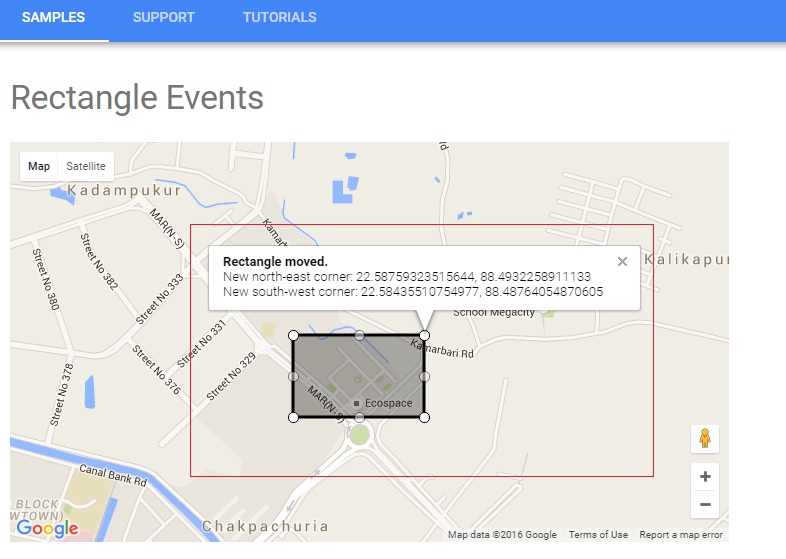
If the position is mentioned as rectangle then first pair of x,y points should be coordinates of latitude and longitude for north east and second pair should be latitude and longitude for south west coordinates of rectangle position on earth.
We can select the cordinates using the above link and use them in MR rule as shown below:
{
  "name": "position",
  "type": "rectangle",
  "geoFencing": "NO",
  "value": {
     "points": [
          {
             "x": "22.58759323515644",
             "y": "88.4932258911133"
           },
           {
             "x": "22.58435510754977",
             "y": "88.48764054870605"
           },
      ]
  }
}
Now we will create the above rule in the following 2 ways:
Using MR API swagger
Using MR portal
Using MR API swagger
Click on POST /routingRules API in swagger, use the above JSON template and hit
Try it out!button, it will create a new MR rule with position parameter value as shown in the image below:
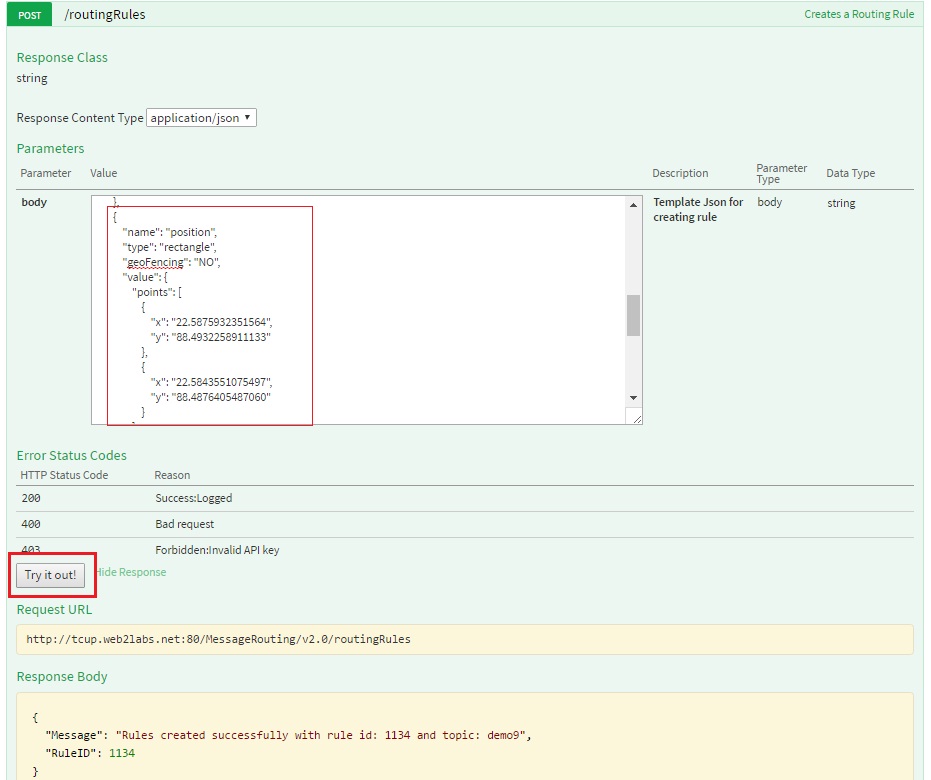
As we can see in the above image, MR rule created with rule ID - 1134 which will be used to start this rule. You can refer to Start the Routing Channel section to start the rule.
Using MR portal
Click on
Create Rulebutton in MR rule, fill in all the details as mentioned in the image below and clickCreate Rulebutton, it will create a new MR rule with position as shown in the image below:
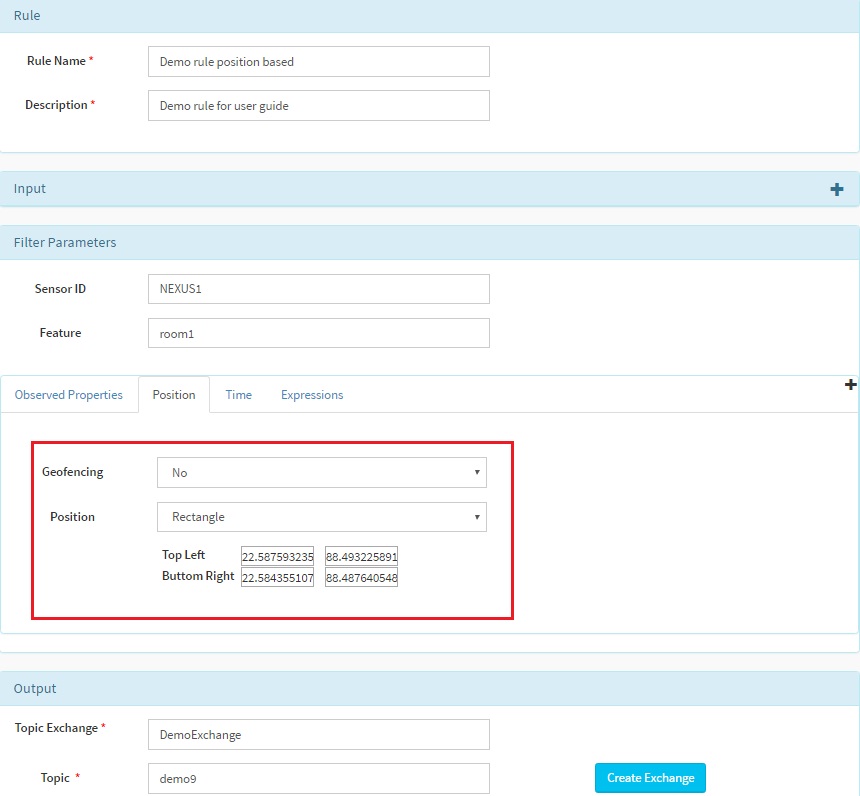
After clicking
Create Rulebutton below message will be dispalyed at the upper right corner with rule ID. Here in our case rule ID is 1135.

As you can see in the above image, MR rule created with rule ID - 1135 will be used to start this rule. You can refer to Start the Routing Channel section to start the rule.
Send Request operation for position coordinates within rectangular area of MR rule:
After the rule is created it needs to be started and then input JSON can be posted to MR rule using send request API. Please refer Execute and View Result section to send the request and view the output in SSE viewer.
Below is the input SOS observation JSON
{
 "version": "1.0.1",
 "observations": [
    {
        "sensor": "NEXUS1",
        "feature": "room1",
        "record": [
            {
                "starttime": "1-JAN-2014 15:30:00 IST",
                "position-global": {
                    "latitude": "22.5868007637857",
                    "longitude": "88.491251785278",
                    "altitude": "2m"
                },
                "output": [
                    {
                        "name": "OutsideSensorTemp",
                        "value": "32.0",
                        "type": "decimal"
                    }
                ]
            }
        ],
        "meta-data": []
    }
  ]
}
Here in input JSON we can see that sensor name is NEXUS1, feature is room1 and latitude and longitude having the value which lies in rectangular area of MR rule. We can now use send request API to verify this rule. As the condition matches the MR rule the output is received in SSE viewer. The output remains the same as input:
Geo Fencing -YES
When geo fencing parameter is set as YES the behaviour of the rule is changed and it works only for first change in geo fencing entry or geo fencing exit. In other words it gives the output only if the input data changes to entry or exit status. If the status remains the same, it will not give the output. Create rule JSON remains the same except geoFencing changed to YES.
{
  "name": "position",
  "type": "rectangle",
  "geoFencing": "YES",
  "value": {
     "points": [
          {
             "x": "22.58759323515644",
             "y": "88.4932258911133"
           },
           {
             "x": "22.58435510754977",
             "y": "88.48764054870605"
           },
      ]
  }
}
Send Request operation for position coordinates within rectangular area with geoFencing as YES:
After the rule is created it needs to be started and then input JSON can be posted to MR rule using send request API. Please refer Execute and View Result section to send the request and view the output in SSE viewer.
Below is the input SOS observation JSON
{
  "version": "1.0.1",
  "observations": [
     {
         "sensor": "NEXUS1",
         "feature": "room1",
         "record": [
             {
                 "starttime": "1-JAN-2014 15:30:00 IST",
                 "position-global": {
                     "latitude": "22.5868007637857",
                     "longitude": "88.491251785278",
                     "altitude": "2m"
                 },
                 "output": [
                     {
                         "name": "OutsideSensorTemp",
                         "value": "32.0",
                         "type": "decimal"
                     }
                 ]
             }
         ],
         "meta-data": []
     }
   ]
 }
Here in input JSON we can see that sensor name is NEXUS1, feature is room1 and latitude and longitude having the value which lies in rectangular area of MR rule.
After the data is sent to MR rule we can see that output of MR rule is received in SSE viewer as shown below:
{
 "observations": [
 {
   "sensor": "NEXUS1",
   "record": [
     {
       "starttime": "1-JAN-2014 15:30:00 IST",
       "position-global": {
         "altitude": "2m",
         "longitude": "88.491251785278",
         "latitude": "22.5868007637857"
       },
       "output": [
         {
           "name": "OutsideSensorTemp",
           "value": "32.0",
           "type": "decimal"
         },
         {
           "name": "geoFencingEvent",
           "value": "entry"
         }
       ]
     }
   ],
   "feature": "room1",
   "meta-data": []
   }
 ],
 "version": "1.0.1"
}
Here we can see in output that the additional parameter is added as geoFencingEvent with the value entry as input data entering in the rectangular area defined in MR rule.
After first entry of data if we send the same input data to MR rule as entry the output will not be generated, as the status remains the same. The next output will be generated only when the status is changed. This means now input data will have coordinates which falls outside the MR rule rectangular coordinates:
{
  "version": "1.0.1",
  "observations": [
     {
         "sensor": "NEXUS1",
         "feature": "room1",
         "record": [
             {
                 "starttime": "1-JAN-2014 15:30:00 IST",
                 "position-global": {
                     "latitude": "11.5868007637857",
                     "longitude": "88.491251785278",
                     "altitude": "2m"
                 },
                 "output": [
                     {
                         "name": "OutsideSensorTemp",
                         "value": "32.0",
                         "type": "decimal"
                     }
                 ]
             }
         ],
         "meta-data": []
     }
   ]
 }
As in the above input JSON we can see the points with above latitude and longitude coordinate is falling outside the rectangle and hence it is exiting the rectangular area and gives the output:
Output data received in SSE viewer will have an additional parameter geofencing added with value exit, after this if we try to send the input data with exit status again, output will not be received. The next data will be received when the status changes to entry”:
{
 "observations": [
 {
   "sensor": "NEXUS1",
   "record": [
     {
       "starttime": "1-JAN-2014 15:30:00 IST",
       "position-global": {
         "altitude": "2m",
         "longitude": "88.491251785278",
         "latitude": "11.5868007637857"
       },
       "output": [
         {
           "name": "OutsideSensorTemp",
           "value": "32.0",
           "type": "decimal"
         },
         {
           "name": "geoFencingEvent",
           "value": "exit"
         }
       ]
     }
   ],
   "feature": "room1",
   "meta-data": []
   }
 ],
 "version": "1.0.1"
}
Create Rule - Circle Geolocation
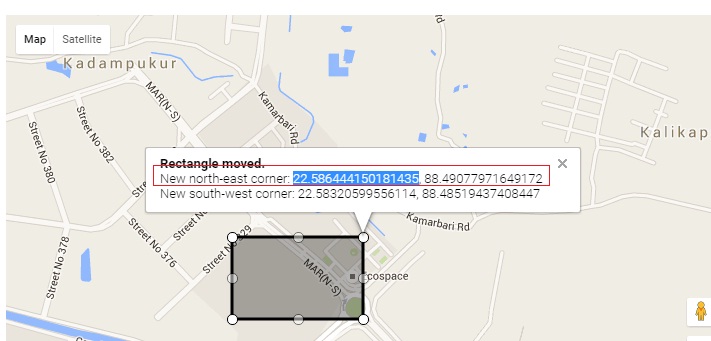
If the position is mentioned as circle then center cordinates point x ,y as latitude - longitude and radius of the circle r with unit should be defined for circle position on earth. The unit is in meter/kilometer/miles and it should be specified in the JSON as m/km/miles respectively.
We can select the center cordinates using google map and use them in MR rule as shown below:
{
  "name": "position",
  "type": "circle",
  "geoFencing": "NO",
  "value": {
     "points": [
         {
             "x": "22.58644415018143",
             "y": "88.49077971649172",
             "r": "2",
             "unit": "km"
         }
     ]
  }
}
Now we will create the above rule in the following 2 ways:
Using MR API swagger
Using MR portal
Using MR API swagger
Click on POST /routingRules API in swagger, use the above JSON template and hit
Try it out!button , it will create a new MR rule with position parameter value as shown in the image below:
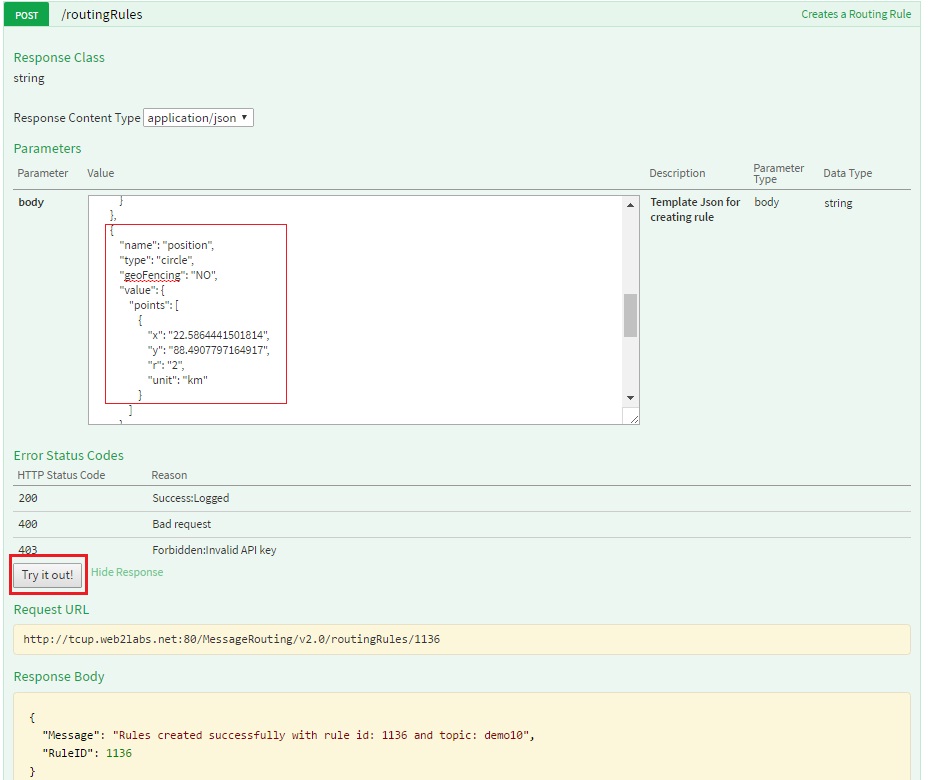
As we can see in the above image MR rule created with rule ID - 1136 will be used to start this rule. Please refer start rule API to start rule.
Using MR portal
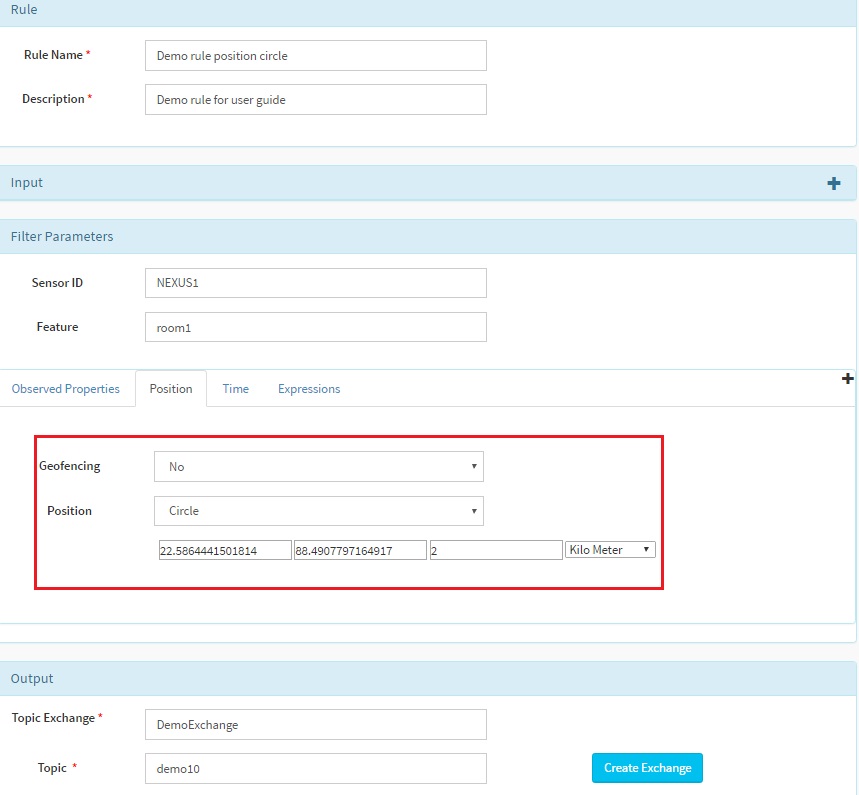
Click on
Create Rulebutton in MR rule, fill in all the details as mentioned in the image below and clickCreate Rulebutton, it will create a new MR rule with position as shown in the image below:
After clicking
Create Rulebutton below message will be dispalyed at the upper right corner with rule ID. Here in our case rule ID is 1137.

As we can see in the above image MR rule created with rule ID - 1137 will be used to start this rule. We can refer to start rule section through MR portal to start rule.
Send Request operation for position coordinates within rectangular area of MR rule:
After the rule is created it needs to be started and then input JSON can be posted to MR rule using send request API. Please refer Execute and View Result section to send the request and view the output in SSE viewer.
Below is the input SOS observation JSON
{
  "version": "1.0.1",
  "observations": [
     {
         "sensor": "NEXUS1",
         "feature": "room1",
         "record": [
             {
                 "starttime": "1-JAN-2014 15:30:00 IST",
                 "position-global": {
                     "latitude": "22.5837893309946",
                     "longitude": "88.4893635101318",
                     "altitude": "2m"
                 },
                 "output": [
                     {
                         "name": "OutsideSensorTemp",
                         "value": "32.0",
                         "type": "decimal"
                     }
                 ]
             }
         ],
         "meta-data": []
     }
   ]
 }
Here in input JSON we can see that sensor name is NEXUS1, feature is room1 and latitude and longitude having the value which lies in circular area of MR rule. We can now use send request API to verify this rule.
After the data is sent to MR rule we can see that output of MR rule is received in SSE viewer.The output remains the same as input:
Circle Geo Fencing -YES
When geo fencing parameter is set as YES the behaviour of the rule is changed and it works only for first change in geo fencing entry or geo fencing exit. In other words it gives the output only if the input data changes to entry or exit status. If the status remains the same, it will not give the output. Create rule JSON for circle remains the same except geoFencing changed to YES. It can be created through MR portal or API as mentioned above.
{
  "name": "position",
  "type": "circle",
  "geoFencing": "YES",
  "value": {
     "points": [
         {
             "x": "22.58644415018143",
             "y": "88.49077971649172",
             "r": "2",
             "unit": "km"
         }
     ]
  }
}
Send Request operation for position coordinates within circular area with geoFencing as YES:
After the rule is created it needs to be started as mentioned above and then input JSON can be posted to MR rule using send request API. For this we have to start the SSE viewer page as it is mentioned in send request section.
Below is the input SOS observation JSON
{
  "version": "1.0.1",
  "observations": [
     {
         "sensor": "NEXUS1",
         "feature": "room1",
         "record": [
             {
                 "starttime": "1-JAN-2014 15:30:00 IST",
                 "position-global": {
                     "latitude": "22.5823232148872",
                     "longitude": "88.4898355789187",
                     "altitude": "2m"
                 },
                 "output": [
                     {
                         "name": "OutsideSensorTemp",
                         "value": "32.0",
                         "type": "decimal"
                     }
                 ]
             }
         ],
         "meta-data": []
     }
   ]
 }
Here in input JSON we can see that sensor name is NEXUS1, feature is room1 and latitude and longitude have the value which lies in circular area of MR rule. Please refer Execute and View Result section to send the request and view the output in SSE viewer.
After the data is sent to MR rule we can see that output of MR rule is received in SSE viewer as shown in the image below:
{
 "observations": [
 {
   "sensor": "NEXUS1",
   "record": [
     {
       "starttime": "1-JAN-2014 15:30:00 IST",
       "position-global": {
         "altitude": "2m",
         "longitude": "88.4898355789187",
         "latitude": "22.5823232148872"
       },
       "output": [
         {
           "name": "OutsideSensorTemp",
           "value": "32.0",
           "type": "decimal"
         },
         {
           "name": "geoFencingEvent",
           "value": "entry"
         }
       ]
     }
   ],
   "feature": "room1",
   "meta-data": []
   }
 ],
 "version": "1.0.1"
}
Here we can see in output that the additional parameter is added as geoFencingEvent with the value entry as input data is entering in the circular area defined in MR rule.
After first entry of data, if we send the same input data to MR rule as entry the output will not come as the status remains the same. The next output will come only when the status is changed. This means now input data will have coordinates which falls outside the MR rule circular coordinates:
{
  "version": "1.0.1",
  "observations": [
     {
         "sensor": "NEXUS1",
         "feature": "room1",
         "record": [
             {
                 "starttime": "1-JAN-2014 15:30:00 IST",
                 "position-global": {
                     "latitude": "11.5823232148872",
                     "longitude": "45.4898355789187",
                     "altitude": "2m"
                 },
                 "output": [
                     {
                         "name": "OutsideSensorTemp",
                         "value": "32.0",
                         "type": "decimal"
                     }
                 ]
             }
         ],
         "meta-data": []
     }
   ]
 }
As in the above input JSON we can see the points with above latitude and longitude coordinate is falling outside the circle and hence it is exiting the circular area and giving the output:
Output data received in SSE viewer will have an additional parameter geofencing added with value exit, after this if we try to send the input data with exit status again, output will not be received. The next data will be received when the status changes to entry:
{
 "observations": [
 {
   "sensor": "NEXUS1",
   "record": [
     {
       "starttime": "1-JAN-2014 15:30:00 IST",
       "position-global": {
         "altitude": "2m",
         "longitude": "45.4898355789187",
         "latitude": "11.5823232148872"
       },
       "output": [
         {
           "name": "OutsideSensorTemp",
           "value": "32.0",
           "type": "decimal"
         },
         {
           "name": "geoFencingEvent",
           "value": "exit"
         }
       ]
     }
   ],
   "feature": "room1",
   "meta-data": []
   }
 ],
 "version": "1.0.1"
}
Create Rule - Polygon Geolocation
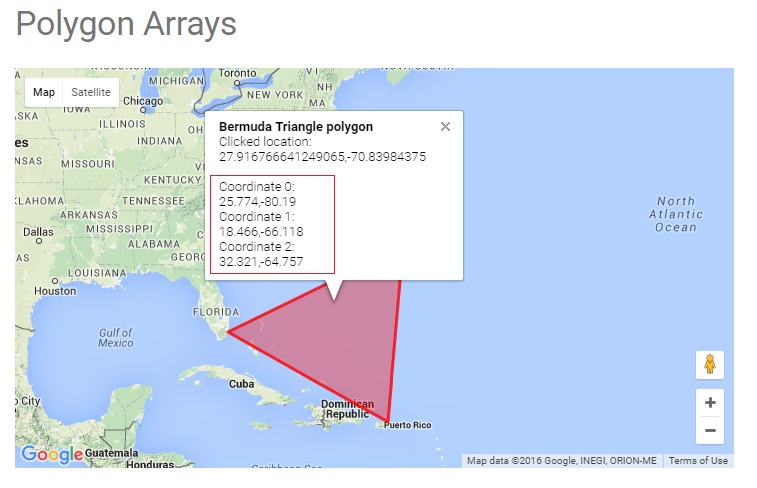
If the position is mentioned as polygon then each and every corner of a polygon should be defined as pair of x,y as latitude and longitude. There can be three or more than three points in a polygon.
We can select the polygon cordinates using google map and use them in MR rule.
{
  "name": "position",
  "type": "polygon",
  "geoFencing": "NO",
  "value": {
     "points": [
         {
             "x": "25.774",
             "y": "-80.190"
         },
         {
             "x": "18.446",
             "y": "-66.118"
         },
         {
             "x": "32.321",
             "y": "-64.757"
         }
     ]
  }
}
Now we will create the above rule in the following 2 ways:
Using MR API swagger
Using MR portal
Using MR API swagger
Click on POST /routingRules API in swagger, use the above JSON template and hit Try it out! button, it will create a new MR rule with position parameter value as shown in the image below:
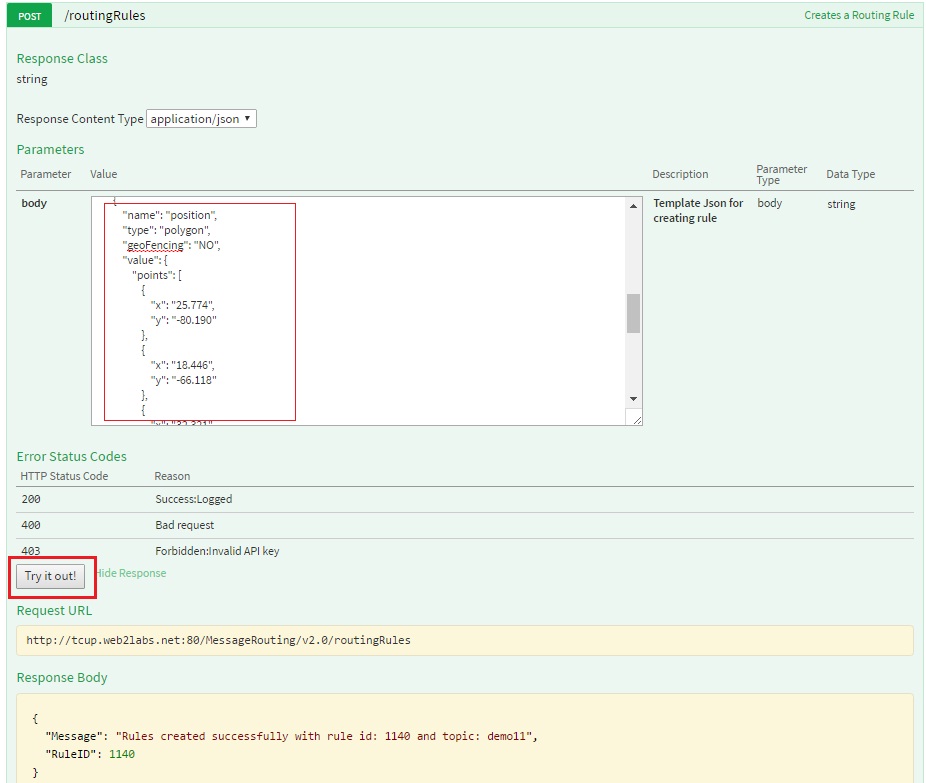
As you can see in the above image MR rule created with rule ID - 1140 will be used to start this rule. You can refer to Start the Routing Channel section to start the rule.
Using MR portal
Click on Create Rule button in MR rule, fill in all the details as mentioned in the image below and click Create Rule button, it will create a new MR rule with position as shown in the image below:
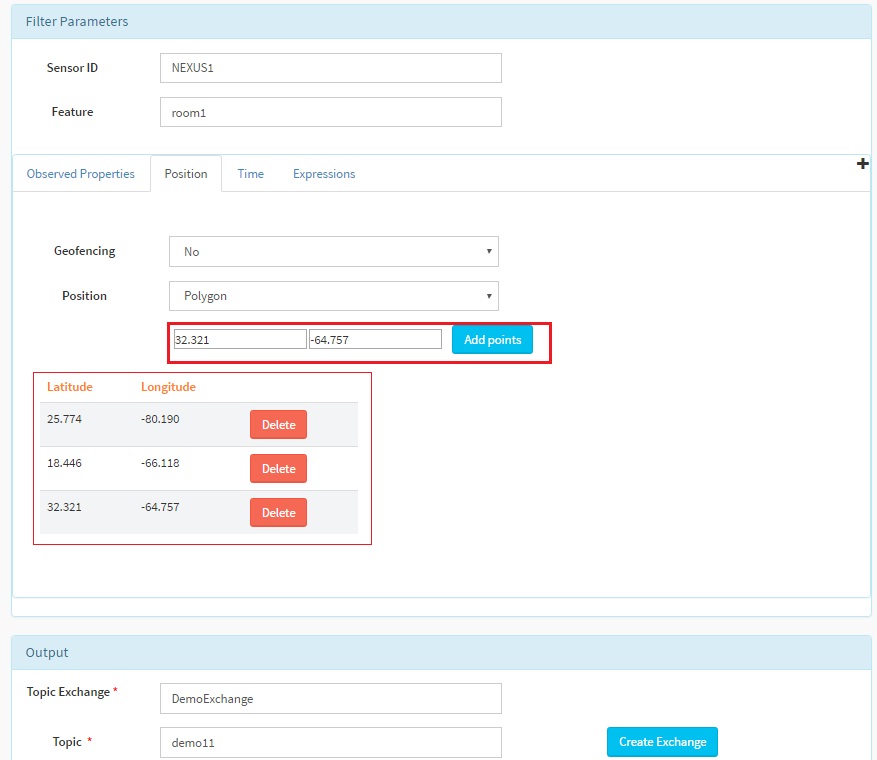
After clicking
Create Rulebutton the below message will be dispalyed at the upper right corner with rule ID. Here in our case rule ID is 1141.

As you can see in the above image MR rule created with rule ID - 1141 will be used to start this rule. You can refer to Start the Routing Channel section to start rule.
Send Request operation for position coordinates within polygon area of MR rule:
After the rule is created it needs to be started as mentioned above and then input JSON can be posted to MR rule using send request API. Please refer Execute and View Result section to send the request and view the output in SSE viewer.
Below is the input SOS observation JSON
{
  "version": "1.0.1",
  "observations": [
     {
         "sensor": "NEXUS1",
         "feature": "room1",
         "record": [
             {
                 "starttime": "1-JAN-2014 15:30:00 IST",
                 "position-global": {
                     "latitude": "27.916766641",
                     "longitude": "-70.83984375",
                     "altitude": "2m"
                 },
                 "output": [
                     {
                         "name": "OutsideSensorTemp",
                         "value": "32.0",
                         "type": "decimal"
                     }
                 ]
             }
         ],
         "meta-data": []
     }
   ]
 }
Here in input JSON we can see that sensor name is NEXUS1, feature is room1 and latitude and longitude having the value which lies in polygon area of MR rule. We can now use send request API to verify this rule.
After the data is sent to MR rule we can see that output of MR rule is received in SSE viewer. The output remains the same as input:
Polygon Geo Fencing -YES
When geo fencing parameter is set as YES the behaviour of the rule is changed and it works only for the first change in geo fencing entry or geo fencing exit. In other words it gives the output only if the input data changes to entry or exit status. If the status remains the same, it will not give the output. Create rule JSON for polygon remains the same except geoFencing changed to YES. It can be created through MR portal or API as mentioned above.
{
  "name": "position",
  "type": "polygon",
  "geoFencing": "YES",
  "value": {
     "points": [
         {
             "x": "25.774",
             "y": "-80.190"
         },
         {
             "x": "18.446",
             "y": "-66.118"
         },
         {
             "x": "32.321",
             "y": "-64.757"
         }
     ]
  }
}
Send Request operation for position coordinates within circular area with geoFencing as YES:
After the rule is created it needs to be started as mentioned above and then input JSON can be posted to MR rule using send request API. For this we have to conimage and start SSE viewer page as it is mentioned in send request section.
Below is the input SOS observation JSON
{
  "version": "1.0.1",
  "observations": [
     {
         "sensor": "NEXUS1",
         "feature": "room1",
         "record": [
             {
                 "starttime": "1-JAN-2014 15:30:00 IST",
                 "position-global": {
                     "latitude": "27.916766641",
                     "longitude": "-70.83984375",
                     "altitude": "2m"
                 },
                 "output": [
                     {
                         "name": "OutsideSensorTemp",
                         "value": "32.0",
                         "type": "decimal"
                     }
                 ]
             }
         ],
         "meta-data": []
     }
   ]
 }
Here in input JSON we can see that sensor name is NEXUS1, feature is room1 and latitude and longitude having the value which lies in polygon area of MR rule. We can now use send request API to verify this rule.
After the data is sent to MR rule we can see that output of MR rule is received in SSE viewer as shown below:
{
 "observations": [
 {
   "sensor": "NEXUS1",
   "record": [
     {
       "starttime": "1-JAN-2014 15:30:00 IST",
       "position-global": {
         "altitude": "2m",
         "longitude": "-70.83984375",
         "latitude": "27.916766641"
       },
       "output": [
         {
           "name": "OutsideSensorTemp",
           "value": "32.0",
           "type": "decimal"
         },
         {
           "name": "geoFencingEvent",
           "value": "entry"
         }
       ]
     }
   ],
   "feature": "room1",
   "meta-data": []
   }
 ],
 "version": "1.0.1"
}
Here we can see in output that the additional paramter is added as geoFencingEvent with the value entry as input data is entering in the circular area defined in MR rule.
After first entry of data if we send the same input data to MR rule as entry the output will not come as the status remains the same. The next output will come only when the status is changed. This means that input data now have coordinates which falls outside the MR rule polygon coordinates:
{
  "version": "1.0.1",
  "observations": [
     {
         "sensor": "NEXUS1",
         "feature": "room1",
         "record": [
             {
                 "starttime": "1-JAN-2014 15:30:00 IST",
                 "position-global": {
                     "latitude": "32.916766641",
                     "longitude": "-40.83984375",
                     "altitude": "2m"
                 },
                 "output": [
                     {
                         "name": "OutsideSensorTemp",
                         "value": "32.0",
                         "type": "decimal"
                     }
                 ]
             }
         ],
         "meta-data": []
     }
   ]
 }
As in the above input JSON we can see the points with above latitude and longitude coordinate is falling outside the polygon and hence it is exiting the circular area and giving the output:
Output data received in SSE viewer will have an additional parameter geofencing added with value exit, after this if we try to send the input data with exit status again, output will not be received. The next data will be received when the status changes to entry:
{
 "observations": [
 {
   "sensor": "NEXUS1",
   "record": [
     {
       "starttime": "1-JAN-2014 15:30:00 IST",
       "position-global": {
         "altitude": "2m",
         "longitude": "-40.83984375",
         "latitude": "32.916766641"
       },
       "output": [
         {
           "name": "OutsideSensorTemp",
           "value": "32.0",
           "type": "decimal"
         },
         {
           "name": "geoFencingEvent",
           "value": "exit"
         }
       ]
     }
   ],
   "feature": "room1",
   "meta-data": []
   }
 ],
 "version": "1.0.1"
}